Friday, December 25, 2015

Concrete Christmas week

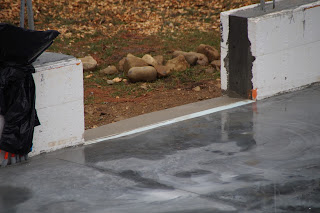
Way late posting this, but in the days before Christmas I managed to mix up and pour the sills for each of the four door openings.


Side door after the pour.


Back door after it's pour. 


Garage door sills poured and floated. Saved these guys for last after I got my technique down on the smaller doors. 


Left Garage door after curing a few days and the forms stripped off.


Right door as well.


Side door. For all the doors I left a 2" foam buffer between the slab and the sill on all the doors. The top piece is 1" foam, and below it is Fox blocks.


Back door with the forms stripped.


Thursday, December 10, 2015

Tree Work

We had six very large Eastern White Pines on the property ranging in age from 60 to 100 years old. One was a scrappy pasture pine with no real usable logs in it, but the others generated a number of logs suitable for the sawmill.

I had my brother in law - Ed Pike of Ed Pike's tree service drop all the trees for me, and chip up all the smaller stuff. We used the chips to mulch the hill that had been regraded, and cover some of the other exposed gravel and dirt around the building site to cut down the mud.


Ed dropping one of the pines in a cluster.


Ed topping some of the remaining trees before dropping them. We chipped this stuff straight onto the bank we had regraded. 


 Susan's nephew Blake tackling the big, 104 year old pine.


Break time after dropping that bad boy.


30 logs ready for me to bring up the saw mill.

Sunday, December 6, 2015

Got Slab

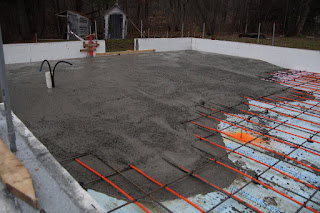
I had Glenn Sherman from Crow Hill Concrete do the slab pour and finishing for me. They set lines on the walls and set pins in the middle of the floor, and basically eyeballed the pour to get the concrete at the level they wanted.

Here they are working the first corner of the slab, bringing it up to the level marks on the wall. 

After the first truck's worth of concrete they had just about half the slab poured. The rear is thicker, since we slope about 3/4 of an inch per 10' on the front 20' of the slab.

Slab setting up after screed and bull float.


Glenn making one of four or five passes with the power trowel.


Two days later, and the saw cuts for the control joints are in.

Wednesday, November 11, 2015

Tubing, Rebar, Ties and Backaches


Following the laying of the insulation, the next step was the rebar and the PEX tubing for radiant heat.

For the radiant system, I used LoopCAD to help me lay out the design for the tubing. With 1/2" PEX, about 1 foot of tubing is required per square foot of floorspace. Runs need to be under 300 feet. I did three runs of roughly 250 feet for the system, and didn't run it under the staircase to keep the design within the 750 feet I had to work with. 

I started with laying out the rebar at 32" on center. Final grid will be 16" on center, but PEX is sandwiched between layers.  

 Here's the tubing mostly laid out.

Final layout of the tubing and rebar. Aggravated the back after 500+ rebar ties and 700 or so zip ties on the tubing. Where the control joints will be, I wrapped the tubing with sill seal foam to protect the tubing from concrete movement. At the door openings I  filled in with leftover foxblock foam above the final height of the slab. After the slab has cured, I will trim the foam down to slab level. 

I put a tarp over the foundation to keep sunlight off the tubing until the slab is poured. 

Thursday, October 22, 2015

Backfill and Floor prep

After stripping the bucks and bracing, there was a bunch of prep work for the backfill and the slab prep. 
 Here the foundation wrap has been installed. It's a HDPE plastic with dimples to allow any trapped moisture on the walls to run down to the perimeter drain.

 Saturday Ed, Charlie and Chaz helped with the backfill, with Charlie's excavator getting the bulk of the work, trenching for Power, Septic, Water and the drain pipe off the perimeter drain, and the backfill. Nice to have brother-in-laws with equipment.

 Compacting the base for the slab after two mixer deliveries of 14 yards each, and another 20 yards moved by hand from outside the foundation to the interior by rake, shovel and wheelbarrow (lots of them) over five days.

A break to smile at my chief cheerleader.

One inch rigid foam installed over the stone and all the seams taped. Perpendicular to this run will be the 2 inch rigid foam stacked in the corner for R15 total. Probably overkill with R23 walls down below 3', but the radiant heat will be more responsive.  

Two inch rigid foam installed but awaiting a dry period to tape all the seams. Then it's time to lay out the rebar and PEX tubing for the radiant heat. 

Monday, October 12, 2015

Walls Poured

On Thursday I assembled a crew of six guys, and we poured the walls. It took 13 yards of concrete, delivered in two trucks. The pour took a little over two hours, then we had to finish the tops of the walls and set the anchor bolts.

Next up this week is pulling the braces and all the bucks and the splices over the seams, then install the membrane over the outer wall, and start the backfill.

Here's the fox blocks basically ready to go. Vertical rebar is in place, bucks are in place over all openings in the wall, and the bracing is all in place and adjusted. 

Starting the pour with the first truck. 

Emptied the first 6 1/2 yards.

The crew waiting on the second truck. 

Resuming the pour where we left off. We got a bit over 3/4 around the building trying to get a 3' lift around the entire foundation. We had a fabricated box to give a bigger target for the chute versus the 6" wall opening. 
 Larry and Bill after filling the box with leftover concrete to use as a step for one of our sheds. 

The team in action. 

 Mike helping the second driver clean things up. 

Stu and Ryan floating the top of the wall. 

Wednesday, September 30, 2015

Fox Blocks for the frost wall forms

Now that I'm back in town, it's time to get the foundation finished before old man winter gets here.


First order of business was installing a perimeter drain and setting the placement for the outside of the forms with 2 x 4's secured to the footings. The drain was backfilled with stone. More stone will go down once the walls are poured and the liner is wrapped around the walls. 


Monday we received the Fox Blocks. These are insulated concrete forms - basically large Styrofoam legos with a 6" cavity for the concrete wall. Here is the first course going on top of the footing. You can see the pallets of blocks in the background. Each group of 12 blocks on a pallet weighs just over 100 pounds, so they're pretty easy to work with, and surprisingly strong. 


 Given the building is an existing timber frame, the wall length for the building size wasn't an exact multiple of blocks, so we had to cut blocks in the middle of each wall to fill the gap. This will be a stacked seam the whole height of each wall.


Within a couple hours we were working on the second course of blocks. Every row gets horizontal rebar, and when we are done, vertical rebar will be placed every 24" to line up with the pins set in the footings.


 Less than eight hours in with two men and the wall is at 5' - 4" and waiting on my final locations for the rough openings for the garage doors and the side doors.


Rain slowed things the last two days, but we got a couple hours in yesterday putting in the bracing. This afternoon after the rain let up I finalized rough openings in the knee walls and installed the final course of half blocks. I need to lay the planks on the scaffolding, then install the rest of the clips along the final course vertically and horizontally, and install the electrical conduit to give me chases around the eight posts along the perimeter of the building. I also need a couple penetrations in the foundation for water and sewer. I'll also install a ledger board under the side door for the deck that will join the house to the garage. I can screw it temporarily to the integrated studs in the blocks, and set J-bolts in the concrete behind it.

Wednesday, September 2, 2015

Forms Stripped

Final cleanup yesterday before our extended trip to Asia and Europe. I pulled all the forms and then used some water and stones to clean the residual concrete off the form lumber so I can reuse it for the deck between the house and garage. Later this month when I'm back I'll start on the frost walls using Fox Blocks insulated concrete forms.


Monday, August 31, 2015

Forms and Footings

My goal was to get the footings in before we leave for a multiweek trip. It was a push to get it all ready, and lots of thanks to Susan, my friend Bill, and my brother-in-laws who helped with the excavation, some grading for the cement truck to navigate around the perimeter, setting the forms and tips on extra hands for today.

I used new 2x8 PT lumber for the forms. We lubed it up good with some oil, so hopefully they'll clean up well so we can reuse the material for the deck between the house and garage.

Charlie finished the excavation Thursday night and my material for the forms showed up 7 am Friday. Bill and I got the exterior form built Friday, and the interior form ready to go together. Saturday night we finished up that formwork, and Sunday I built and placed the two boxes for the footings in the middle of the building

I ordered 5 yards of concrete to do the footings around the perimeter and two 3x3 footings in the center of the building for two posts that will support the interior girts.

Today was the pour. The five yards was probably exactly enough, though we skipped the second box when it looks short and had the driver clean up over the bank where I'm filling in missing material.


Forms basically ready for the pour.Rebar suspended from the cross-braces, forms set at 18" wide.

Footings up top for central posts for the middle two girts.

First concrete coming down the chute

Mike and I working the concrete in the forms on the east side

Mike and Lee working the concrete on the north side. 

With the excavation, we were able to fill in the big depression on the west side of the building so the concrete truck could reach three sides of the pour directly.

Footing after the pour before we set the pins for the walls

Here I am screeding the footing in the middle of the building. We'll backfill this area with stone after the walls are built next month with Fox Blocks Insulated Concrete forms, then put down 3" of rigid foam before the slab for the garage and workshop is poured.

End of the day with all the pins set for the walls. I did tie a 10' pin to the footing rebar prior to the pour for a ufer ground.