Tuesday, July 19, 2016

The Foam Cup

July was focused on getting exterior wall framing done, and wrapping the entire exterior with Styrofoam rigid insulation. This provides a full thermal break on the building. We'll also stuff the walls with Roxul rock wool insulation, for a total wall insulation of R25.

 Framed in the garage door openings and starting the insulation on the first floor. 

 West side first floor mostly insulated and the wall framing and bracing on the second floor. 

Back (North) first floor window framing done and insulation done.  

 East wall first floor windows rough framed and insulation started. 

 Second floor nearly complete and Joe taking a break in the attic window opening, though second floor window framing still remaining to be finished on west wall. 

Front (south) wall completely framed and insulated, and west wall, though insulation not trimmed on upper windows. Second and third story windows are all 3-0 wide by 3-6 high. First floor window is 3-0 by 4-0 to match it to height of side door rough opening. 

View of west side wall with it's three windows framed and the four sets of braces. It will be a shame to cover them, but at least it will be vintage barn boards for the interior walls. 


Attic gable wall looking out the north window. 

 Attic gable wall looking out the south window over the neighbor's pasture. 

Looking at the east wall - notice no braces on this side so I was able to get an extra window on this side - four on the first and four on the second floor.

Looking at the north end of the shop. Staircase will eventually come up in the left corner of the room. 

 Looking back at the south wall.

Rear (north) wall all insulated. The first floor windows are 3-0 by 4-6 high, and the three upper windows all the same 3-0 by 3-6. 


East wall all insulated, with windows aligned vertically between the floors. 

Saturday, June 18, 2016

Got Roof Closed

This week I worked on closing up the roof before my trip to Africa. The trick was keeping enough spare boards on the floor to keep a catwalk while having enough material to close the roof.

I started last week putting all the boards up on the east side without regard for the synthetic paper I was putting over it, which meant a trip out on the 8 over 12 pitch roof 20+ feet in the air to put down the paper. For the West side I got smart and put the paper down as I went in 2' sections - nail the base of the paper down, then put on another 24" of boards and nail the center of the paper, then put on another 24" and lap the next strip of paper over the last strip. Much safer process.

Starting laying the paper on the east side of the building.

Working the paper across the east  side of the building.

Closing up the roof on the west side, and lapping the paper over the peak. The fun was asking Susan to come up to the attic and kick the ladder out from under me so I could close the last 16' of opening and finish laying down the paper. 

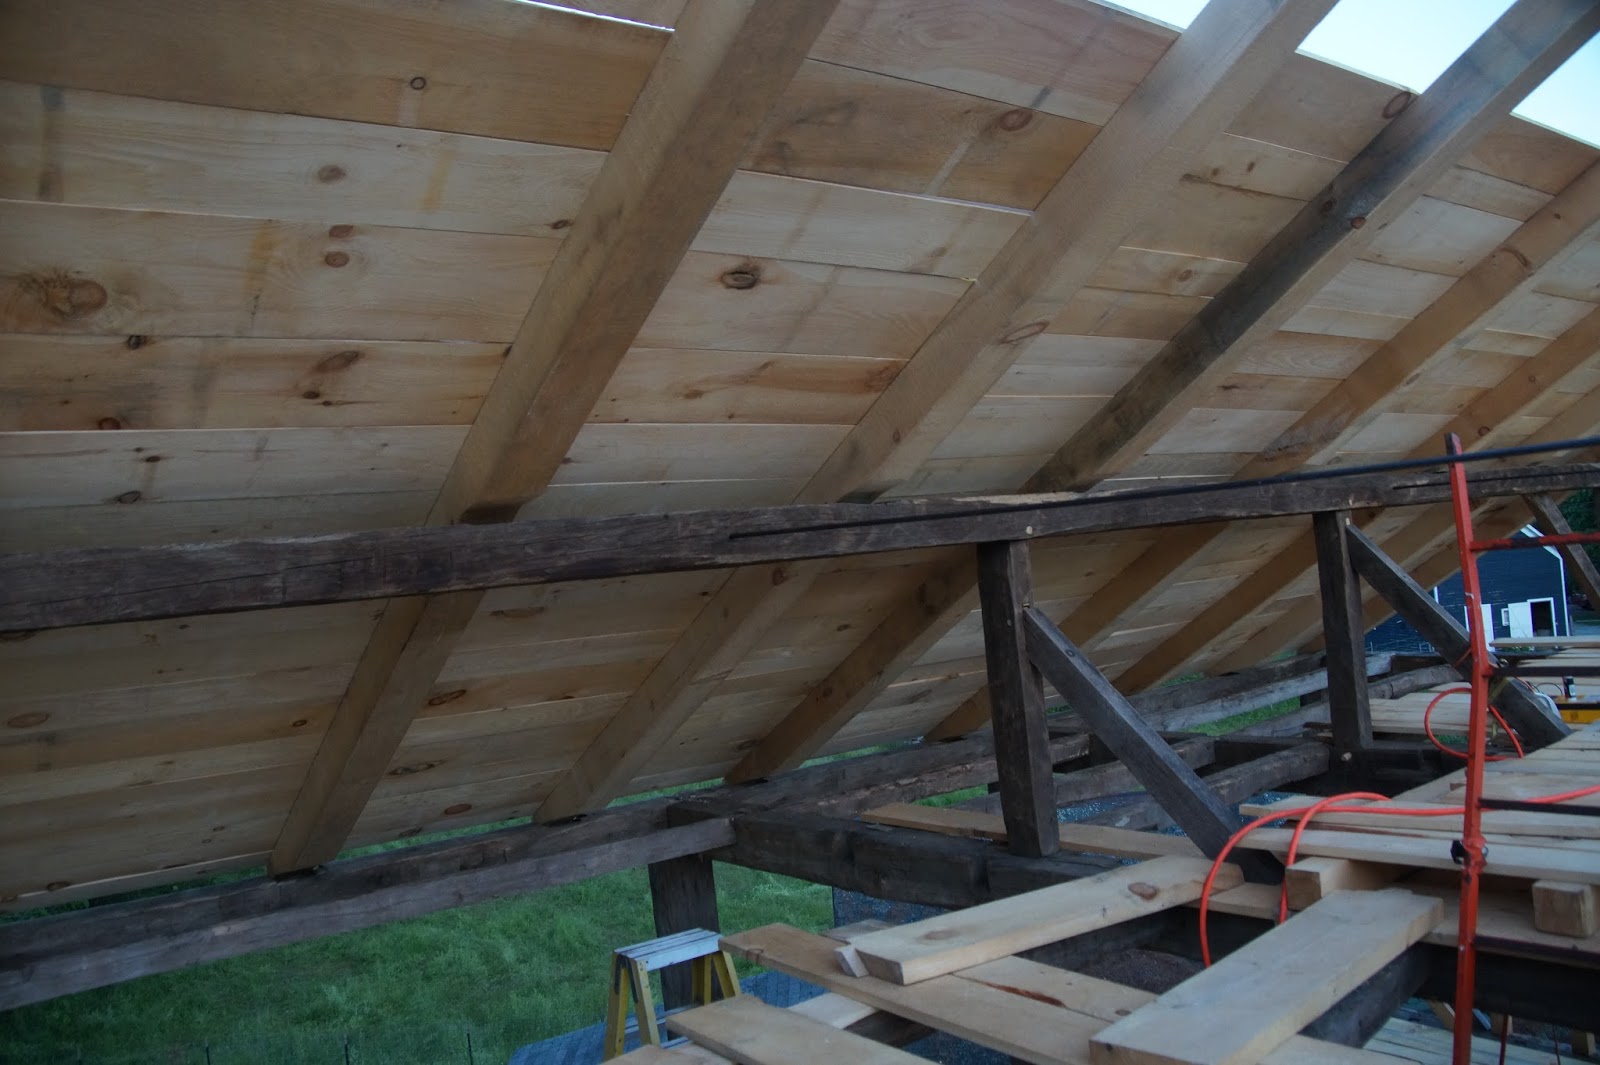
Underside of the finished roof. Eventually the floor boards in the attic will go away, after I have the gable studs and walls all in place. 

Saturday, June 11, 2016

More Big Progress

Raising the frame was one of the big steps for the building. This week the big steps were setting all the rafters and starting on the roof boards. I made pretty good progress with four solid working days this week. One day was pretty much a wash-out with the rain. Can't wait until I have cover over the building to keep things dry. The plan is for that to happen this week.

Thursday Bill joined me and we got the final seven rafters set, and got them all leveled out.

All the rafters in place as seen from the gable end.  

The Laugh In Dance Platform as named by my wife - actually the staircase landing. Stairs will follow the west wall down, then turn right and follow the north gable wall to the floor. 


Had a little scare when I took a step and this joist snapped on me. By the color of the wood, problems existed long ago. Fortunately, I went to my knees and didn't go through the floor. 


There were no joists in the center of the building due to the original staircase and the chimney. I cut new pockets (lots of fun in hard, knotty, 200 year old oak), and fitted up new 4x8 pine joists. I framed part of it with a 3x4 hatch to be able to move stuff between the levels. The auto lift will be below the hatch.


Friday I installed almost half the roof boards - nearly the whole east side of the building. 

Here's a view from the 2nd floor looking up at the ceiling. In the lower left you can see the tension rod connecting the two purlins.


Looking at the building from the south east corner. Hopefully this fall the small house in front will be dismantled. Then I can cut in the driveway and remove the stump from the tree that donated the rafters and much other lumber. 


The building viewed more from the east side. 

Friday, May 27, 2016

Cleanup and little stuff

Heading out of the country for a week, so returned my friend's sawmill and cleaned up some little stuff prior to the trip. 


We've had a little red fox that likes strolling through the construction site, looking for a meal. Susan saw him on the woodpile yesterday, and I caught him on camera heading up the road. 


We pulled up all the levelers, and pulled the sawmill out for the trip home. There's probably still a good foot deep pile of sawdust to use in the garden as compost to keep the weeds down and moisture in. 


What a mess from the sawmill. 


Chad and I framed in the garage door openings yesterday. The doors will be 9' wide and 8' high. 


The purlins have a line of braces to the girts, but they are on the wrong side of the girts. Braces work in compression, but don't really do anything in tension. The braces were all set up in tension, probably to assist in the raising of the purlins into place with a gin pole. I had three choices for fabricating the tension rods, which are fourteen and a half feet long. Option one was get some #4 rebar and 1/2" all-thread, and have the all-thread welded to the rebar. This would blend into the antique beams pretty nicely. Option two was two sections of all-thread and a coupler - no real fabrication, but also wouldn't blend in too well. Option three which I chose, was to get mild steel rod, and thread the ends. I purchased the rods, and then took them over retired 92 year old Don Brown to have him help me thread them in his machine shop. They were too long to chuck up in his lathe, so we had to put them in a vice and use a little more muscle to get the first threads cut, then it was just count 52 rotations of the handle for the die to get four inches of thread on each end, with stops about every 1/2" to give it a few drops of cutting oil. I worked up a little sweat cutting those threads.  


Even though the house is a couple hundred square feet bigger, the garage is starting to dwarf it, even without the rafters hung. 


What to do with the extra pallets, now that they aren't being used to air-dry the lumber? How about a nice little three bay compost center to make some compost for the garden and flowers. 


I was thinking of removing most of the attic joists and having a cathedral ceiling in the woodworking shop, but with the views up here, I'm considering a small loft to have a sitting area and have a cup of tea. It might also give me some space to store dry lumber for upcoming projects.  


I laid a few more roof boards out to build a work area to use a stepladder to secure the peaks of the rafters when we lay them in place. 


Quite the mess from the sawmill to clean up. We'll have plenty of sawdust for using as mulch in the garden. 


I asked Tom about what to do with this floor joist. I was concerned about the crack. Tom examined the repair and the hand wrought nails, and said that the joist has been holding with the repair since the building was first erected over two centuries ago, so if it would make me feel better, put a couple timber locks in it and call it good, so I did. 

Wednesday, May 25, 2016

Posts and Purlins

Friday was the big day with the crane. Now it's finishing up the rest of the timber frame.

Monday we added interior posts and some 4x4's on the gable ends to provide more support for the second floor and attic. I also had a girt fracture, so repaired it with a 4' long 1/4" steel plate, like it's sister girt that we repaired on the ground.

Tuesday was supposed to be a light shower or two, but we were pretty much washed out with rain. I got a couple new floor joists in the former chimney area, cutting new seats in the girts.

Today we installed most of the attic joists and set the two purlins for the rafters.

 Trying to move beams with the come-along.

 Using the commander to remove an attic joist.

 Starting to set the purlin posts.


 Attic joists in place and purlin posts in place.

 East purlin set.

 Chad building a catwalk on the attic joists so we can set the purlins and rafters.

 Pegging the west purlin.

South view looking at the purlins in place on top of the attic. Next up is the rafters. 

North view of the building. We set 4x4's on the two sides of the north door, which will be a 4' barn door. 

North west view of the frame.

Sunday, May 22, 2016

Timber Frame Raising

When Tom and I started five weeks ago, he said if things go well, we could be ready to raise the frame in two or three weeks. He had originally said a couple months when I bought the frame last year, but it is going way faster.

Tom and I had Noel Dydo out with his crane to lift the timbers into position.  My stepson Chad was out from California, and a couple friends from church, Bill and Larry helped, along with my brother-in-laws Ed and Mike.

The building is a four bent building with two gable ends and two intermediate bents.


We started with the South gable end of the building. Here is this first bent going up in the air.


With the bent in position, Tom then used his beam level to plumb up the bent, and we set some tags to hold it plumb. A normal level won't work on hand hewn beams, because they aren't flat, so the beam level has a roller on each end to register on the beam.


Using the crane, we did have to climb a ladder to pull off the straps after every lift. 


Between the bents, intermediate tie beams are placed to tie the adjacent bents together.


Here's the second bent going up in the air.


With two bents up, it's starting to look like a timber frame.


Tie beams being set to tie the second and third bent together.


Bent number three being set into position.


Three quarters of the building raised.


Lots of spectators - my mother-in-law (back row) was the chief cheerleader.

Second time we're putting up this tie beam. Fortunately, it didn't hit anyone when it fell out, though it did put a serious dent in the pine sill. 


Starting to set the floor joists after we pulled the rack out of the building. When it was first set, it leaned about 5" to the west, but a little come-along work and it was back to plumb east-west as well as north-south.


Starting to look like a floor system - now just need some boards down to get around up here.


Why carry boards up one at a time when you can bring up a full 4'x4'x16' bundle in one lift. Only problem was the weight stressed a girt, so I've got one more girt repair to do this week - but pretty easy to do before the floor is all down.


Starting to set the west tie beam - the right tie beam is already set. 


Setting up a come-along to pull the tie beam into final location.


All tied together - the core timber frame is now assembled.


The rafters have a support mid span known as a purlin. We didn't set them on their posts, but did have them lifted up to the attic to make setting them easier. We'll be able to lift them the last 3 1/2 feet with a come-along strung off a ladder.


We brought the attic joists up with the crane, and the strap got stuck underneath the bundle, so I removed one end and let the crane pull it out.


We also had the crane bring roof boards and rafters up to the attic to save carrying them up one at a time.  I also tested to see how roomy the garage was with the Tahoe parked in it.


Lots of empty pallets to repurpose now that the lumber is distributed around the building.